How I Got Into Flipping Furniture
In the winter of 2022, Canadians were still living with some of the strictest COVID-19 restrictions, and it felt like the end was constantly being pushed further out of reach. The government kept shifting the goalposts on when these measures would finally ease, leaving many of us in a state of uncertainty.
I found myself searching for ways to make some extra cash from home and stumbled upon the idea of furniture flipping. At first, it seemed like a bit of a wild concept — a lot of effort for maybe just a couple of hundred bucks. But curiosity got the best of me, so I decided to browse Facebook Marketplace to see what was available. That’s when I came across a beat-up, solid wood dresser. With no experience to speak of, I took a chance and offered the $50 asking price. My husband picked it up later that day, and that’s how our furniture flipping journey began.


That first dresser had a broken foot and some damage to the top, and I’ll admit, I wasn’t sure what I’d gotten myself into. My husband even suggested it might be better off at the dump, convinced no one would want it. But I pressed on, did the repairs, and before I knew it, it sold for $250! Not bad, and looking back, I might have even underpriced it.
In this post, I’ll walk you through the repeatable steps I used to flip furniture, along with my top tips for selecting the right pieces to work on. Plus, I’ll share my highest-earning flip, my personal favorite, and one that I ended up keeping for myself!
The Process: How to Flip Furniture the Easy Way
Step.1 Choosing a Piece of Furniture
Choosing the right piece of furniture to refinish is one of the most important steps in the process. Some pieces simply won’t look good no matter how much work you put into them, so it’s worth being selective. Look for quality construction—solid wood is always a great choice, as it holds up well to refinishing. I found all of my flips on Facebook Marketplace and highly recommend it as a source for budget-friendly finds. Pay attention to details like sturdy frames, dovetail joints, and real wood drawers, as these are signs of a well-made piece that will refinish beautifully.
Here are a few examples I found this morning on Marketplace. I see a lot of dressers like the one on the left, and while they’re good quality, I wouldn’t recommend buying them for a flip. Even when painted, they just don’t have the right look. The hardware doesn’t suit a painted finish, and the combination of curved drawer tops, curved base, and those little lines cut into the middle give it a dated feel. I’m not sure if it’s from the ‘90s, but it’s stuck in an awkward in-between—too new to be vintage and too old to feel modern. It was just a bad era for furniture design.
You also want to avoid dressers that are completely flat and boxy with no detail. I see a lot of plain chests and dressers like this, and they’re usually made of cheap materials that won’t take paint well or look high-end when refinished. Instead, look for pieces with solid wood construction, interesting details, and a classic shape that will stand the test of time.
The dresser on the right was selling for just $20! It’s solid wood, which is always a great find, and the existing hardware will look good painted—saving you money on new pulls. It also has beautiful detailing on the sides and base that will stand out even more with a fresh coat of paint. The only thing I’m not a fan of is the flower detailing on the front cabinet doors, but that’s an easy fix—I’d just sand those off for a cleaner look.


Step.2 Prepping for Paint
Start by removing all the hardware. If you're reusing it, give it a thorough wash with dish soap or TSP, then set it aside somewhere safe. Next, clean the entire piece of furniture with dish soap or TSP to remove any dirt, grease, or residue—I prefer using microfiber cloths for this step. Once it's dry, inspect the surface for scratches or dents and fill them with wood filler as needed. After the filler has dried, sand the entire piece. You don’t need to strip it down completely—just a light scuff sand to help the new paint adhere better.
Step.3 Prime & Paint
After sanding, wipe down the piece again to remove any dust. Next, apply a shellac-based primer—I used Zinsser B-I-N Shellac-Base Sealer-Primer. It’s a bit pricey ($99 per can in Canada), but a 3.78-liter can lasts through multiple projects. This primer has a strong smell, so I highly recommend using a respirator mask rated for chemical fumes. For the best results with white paint, I found that rolling on two coats of primer with a small sponge roller before painting gave the smoothest, most even coverage.
I used Rustoleum Chalk Paint in White Linen. Since I planned on refinishing multiple pieces, I bought the 3.78-liter can. It looks like they’ve switched to selling smaller cans, but I was still able to find the 3.78L can on Walmart’s website for $146 (Canadian). I really enjoyed using this chalk paint—it goes on beautifully, is super forgiving, and leaves a smooth, matte finish. Typically, two coats of primer and two coats of paint gave the best results. I applied the chalk paint with a brush.

Step.4 Topcoat & Hardware
The topcoat was definitely the trickiest part for me. I experimented with several methods before landing on the one that worked best. My solution was to glue a small blue fabric foam roller to the roller handle, preventing it from rolling. For the topcoat, I’d dip the roller into Minwax Polycrylic and then drag it across the surface from one end to the other. After each pass, I’d dip the roller again and continue from where the last swipe ended. I found it best not to go over the surface too much — if you miss a spot on the first pass, don’t try to fix it until the second coat. Two coats usually did the trick, though sometimes I’d add a third coat on the top for extra durability.
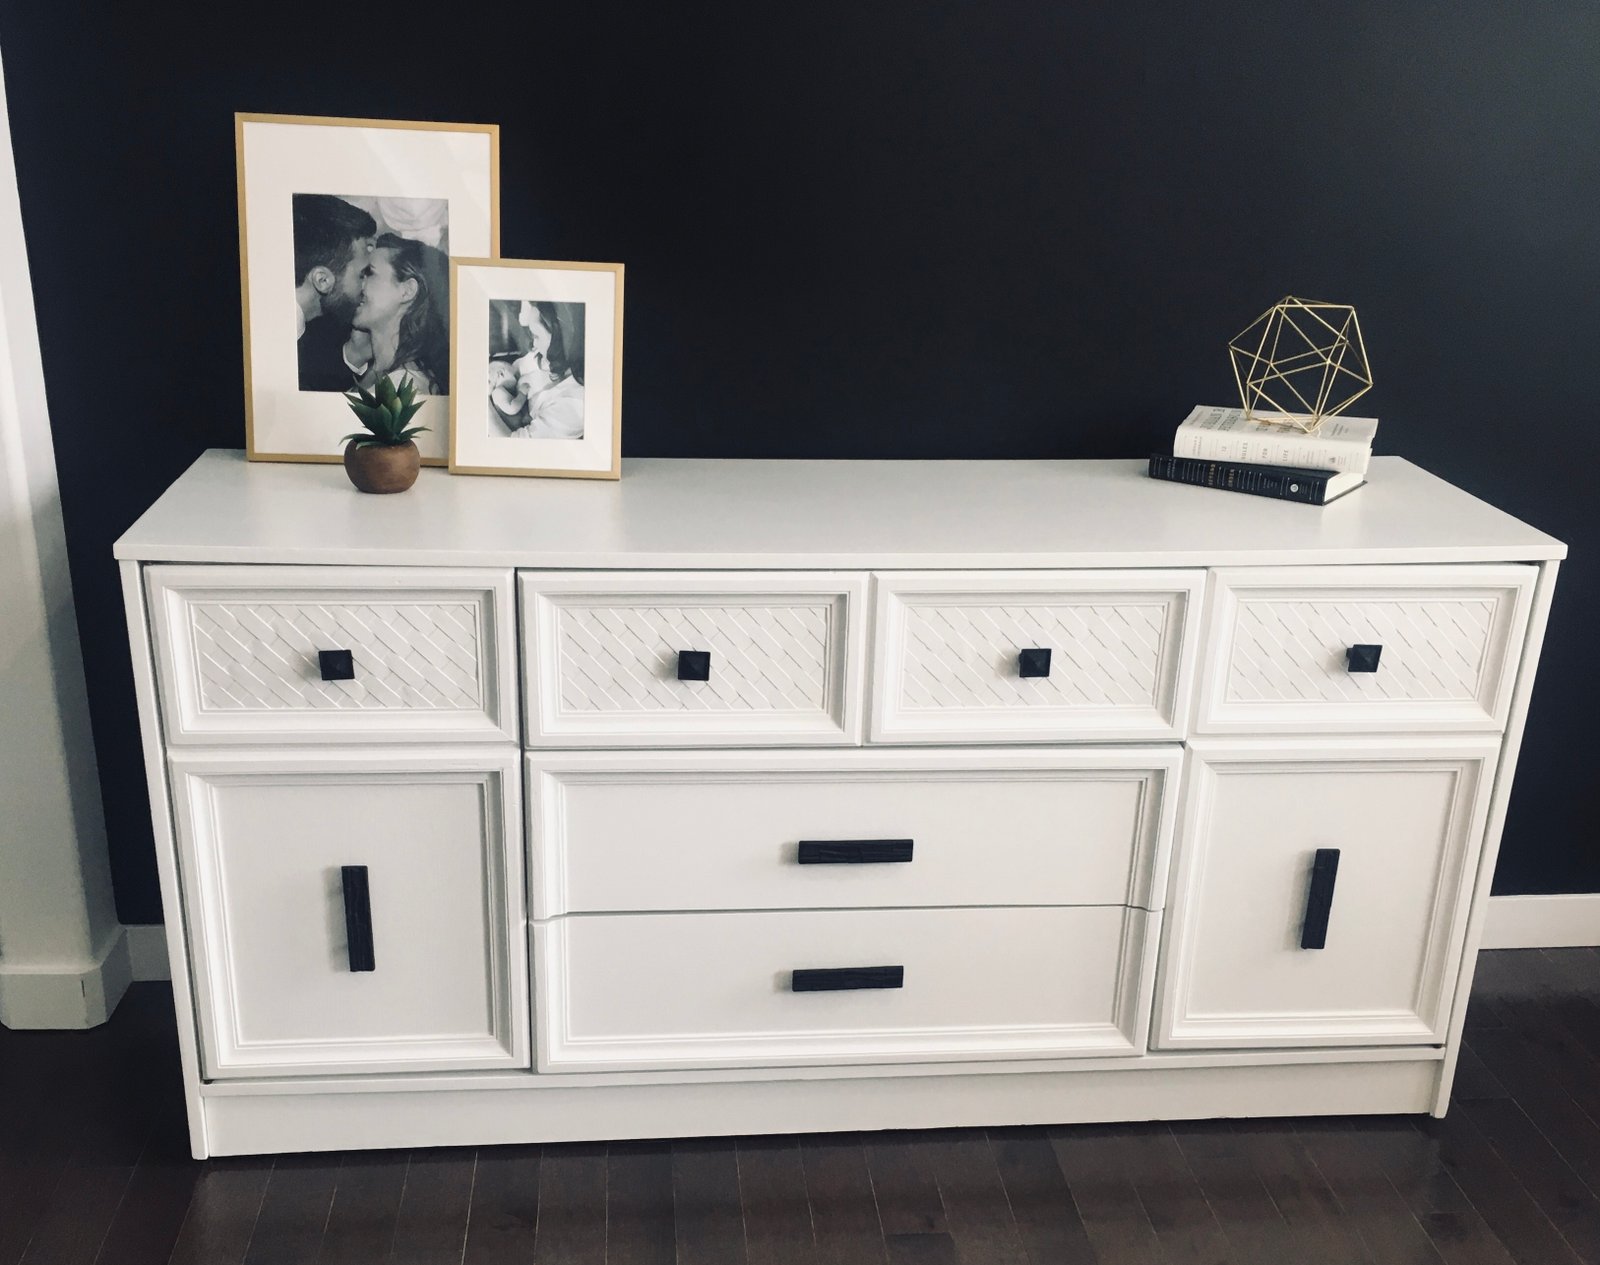
Once the piece is fully coated and dry, it’s time to add the hardware. If you like the original hardware and it still suits the piece, give it a fresh look by painting it matte black or warm gold before reattaching it once dry. If you’re replacing the hardware, Amazon has some great budget-friendly options. The piece in the image above originally came from an old TV stand. I wanted to give it a mid-century modern credenza vibe, so I chose black and gold pulls to complement that aesthetic.
Step.5 Staging & Selling
Finally—my favorite step! This is where all your hard work pays off. Staging can make or break a sale, and I can’t emphasize its importance enough. My husband even started calling it staging sorcery because of how much it transformed the final look of the pieces.
Staging Tips:
Backdrop: A clean, neutral wall is key. Stick to white, off-white, or black—no grey! The grey trend is over, and staging your furniture in a dated-looking space makes the piece feel outdated too.
Flooring: Wood floors look best. If you don’t have them, a beautiful area rug can work. Avoid carpet—it can make your furniture look out of place. In the image below, I staged the piece in an unfinished basement bedroom with concrete floors. The “wood” floor you see is actually a roll of laminate flooring I bought for $20 on Marketplace just for staging.
Decor: Use modern, stylish decor to elevate the look. Some of my favorite staging elements are:
- Black and white photos in gold or black frames
- Plants for a fresh, natural touch
- Vases (ceramic or glass)
- Books to add height and dimension
Grouping: When styling your decor, use groups of three with varying heights for a balanced look.
Photography Tips:
Lighting is everything! Natural light is best—try to take photos during the brightest part of the day.
Take multiple angles to showcase the piece fully. Get a straight-on shot, a side angle, and a close-up of any interesting details.
Keep the focus on the furniture—avoid clutter or anything that distracts from the piece.
A well-staged and well-photographed piece sells faster and for a higher price—it’s worth the extra effort!
Selling Your Furniture
When it comes to selling, I exclusively used Facebook Marketplace, and I don’t think I had a single piece sit for more than 12 hours before selling!
Listing Tips:
Titles Matter! My husband made fun of me for using the phrase Super Cute in multiple listings, but it worked! If I thought a dresser was super cute or a credenza was gorgeous or stylish, I made sure to include that in the title.
Example:
- Super Cute 3-Drawer Solid Wood Dresser
- Gorgeous Mid-Century Modern Credenza
- Stylish Vintage Sideboard – Solid Wood
Descriptions That Sell:
Make sure to include:
- Dimensions (buyers always ask!)
- Pick-up location (I listed the general area of the city, not my exact address)
- Delivery option (I offered delivery for an extra fee)
- Important details about the piece (e.g., solid wood, excellent condition, new hardware, minor imperfections, etc.)
Pricing:
For dressers and credenzas, I found the sweet spot to be $250-$350—this price range attracted buyers quickly while still making the flips worth my time. That said, I was able to get $800 for a matching set of dressers, so it all depends on the piece!
By using the right staging, description, and pricing strategy, you can sell your refinished furniture fast and for top dollar!

Final Thoughts
Flipping furniture has been such a rewarding experience, and I’ve had a lot of fun with it. There’s something exciting about browsing through Marketplace and finding a hidden gem—an old, worn-out piece that I can transform into something beautiful. I especially enjoyed staging the pieces and seeing the positive response from potential buyers. If you don't mind a little hard work and getting your hands dirty, I definitely recommend giving it a try. One thing to keep in mind, though, is having the right space for it. Ideally, a garage is the perfect spot, especially if it’s easy to get the furniture in and out. We didn’t have that luxury, so we had to bring everything down to our basement, which meant navigating tight corners and a narrow stairway—definitely the most dreaded part of the process!
Design tips
When I first started flipping furniture, I planned to tackle a lot of pieces, so I purchased large cans of primer and white chalk paint. White is a safe choice—it’s versatile, sells well, and is easy to stage. While it might be tempting to paint and reuse old hardware, sometimes it’s worth spending a bit extra to buy new pulls. Some vintage hardware can be unique and ornate, and painting it can really highlight its beauty and character. However, other hardware—especially from the '80s and '90s—can look dated and generic. In those cases, replacing it with something sleek and modern can make all the difference.
Lessons Learned
At the start of a project, it can feel like there’s so much work ahead and that it will take forever. But a few days or even a week later, once the piece is sold and you've made some extra cash, you look back and realize it wasn’t nearly as much work as you initially thought.

